Skip to content

Installation ​

MinuteView Automations Installation ​


This guide explains how to install, configure, and connect the MinuteView Automations Engine to your MinuteView Server environment.


1. Overview ​

The MinuteView Automations Engine is responsible for:

  • Executing automation workflows
  • Processing Hangfire job queues
  • Running interop-based tasks (Inventor, MicroStation, etc.)
  • Acting as distributed microservices for scalable execution

You may install:

  • A single automation server
  • Multiple automation servers
  • Dozens of automation servers across multiple machines

Each additional automation server increases execution capacity and can act as a microservice worker.


2. Architecture Overview ​

Primary Automation Server ​

The first automation server installed will:

  • Connect to the MinuteView Server
  • Connect to the Hangfire database
  • Process task queues

Additional Automation Servers ​

You may install additional automation servers that:

  • Connect to the same database
  • Join the Hangfire queue
  • Execute tasks in parallel

Important Behavior ​

For interop applications (e.g., MicroStation, Inventor):

  • Hangfire ensures only one server at a time processes tasks requiring single-access interop
  • Prevents application conflicts
  • Enables distributed but controlled execution

This architecture allows automation engines to behave like scalable microservices.


3. Prerequisites ​

Before installation, ensure:

  • [ ] MinuteView Server is installed and configured
  • [ ] You have exported the MinuteView configuration file (from Server Installation Step 9)
  • [ ] SQL Server is accessible (for Hangfire)
  • [ ] Appropriate network connectivity exists between servers
  • [ ] (Optional) SSL certificate (PFX file) if HTTPS is required

4. Installing MinuteView Automations ​

Step 4.1 – Obtain Installation Media ​

You will be provided with the Automations installation media by Tentech.

Step 4.2 – Run the Installer ​

  1. Execute the installer on your chosen server
  2. Follow the installation wizard

You may install on:

  • The same server as MinuteView Server
  • A dedicated automation server
  • Multiple servers (recommended for scaling)

Installation Location ​

After installation, files will be located at:

C:\Program Files (x86)\Tentech\MinuteView Automations

5. First-Time Startup ​

After installation:

  1. Navigate to the installation folder
  2. Locate: MinuteViewAutomations.exe
  3. Double-click the EXE to start the application

First-Time Configuration

For first-time configuration, run it directly (not as a Windows service).


What Happens on First Launch ​

  • A command line window will open
  • Startup logs will display
  • The system will detect no configuration file exists
  • A browser will automatically open to: http://localhost:5000

This opens the Automations Setup Wizard.


6. Automations Setup Wizard ​

The setup consists of 3 main steps plus a final review.


Step 1 – Import MinuteView Server Configuration ​

Import Configuration

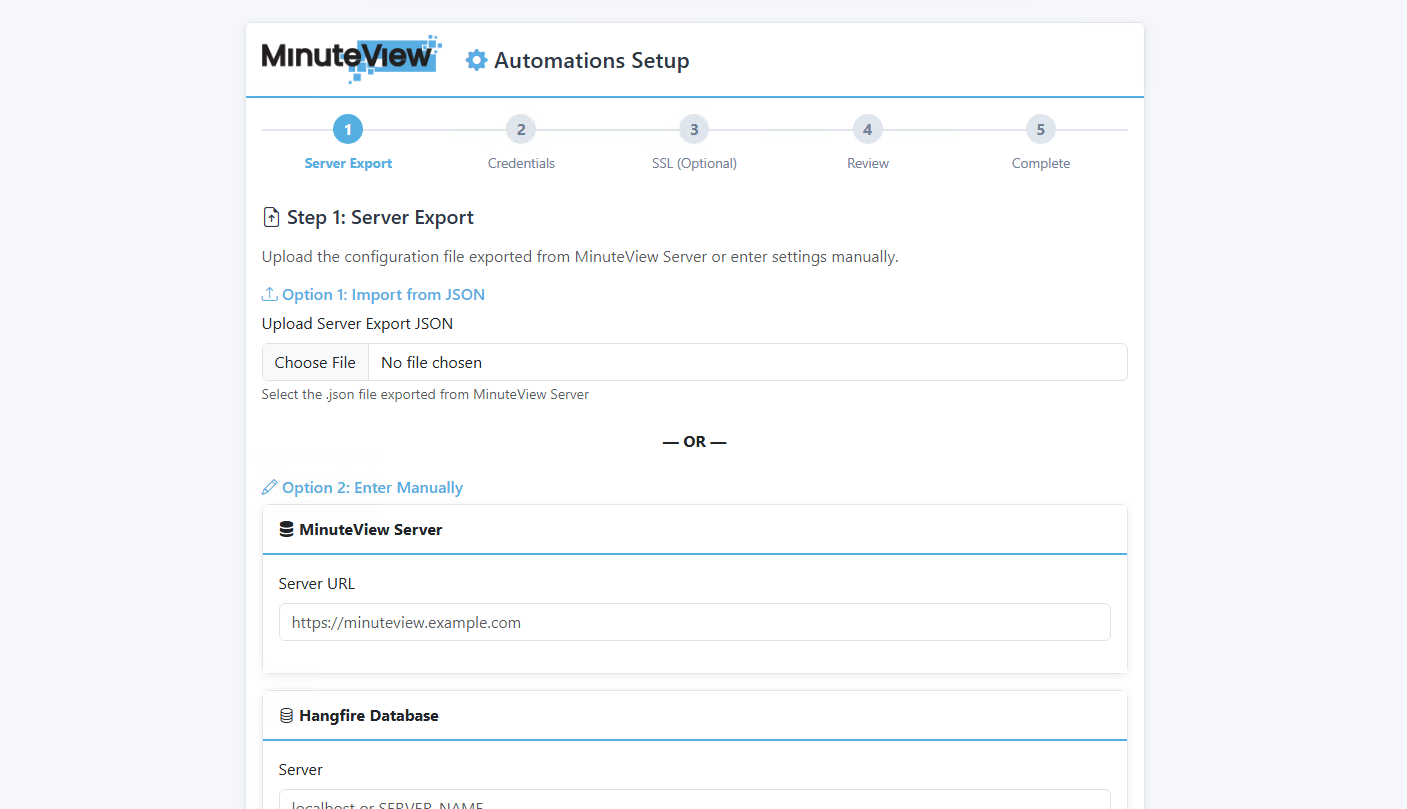
This step configures:

  • MinuteView Server URL
  • Hangfire database connection
  • Elasticsearch settings (if used)
  • Other system-level configuration

During the MinuteView Server installation, you were prompted to export the configuration.

  1. Click Upload Configuration File
  2. Select the exported config file
  3. The form fields will auto-populate

Configuration Export

This prevents manual re-entry and reduces errors. The configuration file was available during Server Installation Step 9.

Manual Configuration (If No Export Available) ​

If you do not have the exported config file:

  • Enter all connection details manually
  • Ensure database connection is correct
  • Validate connectivity before proceeding

Step 2 – Register Client Application ​

Client Application Registration

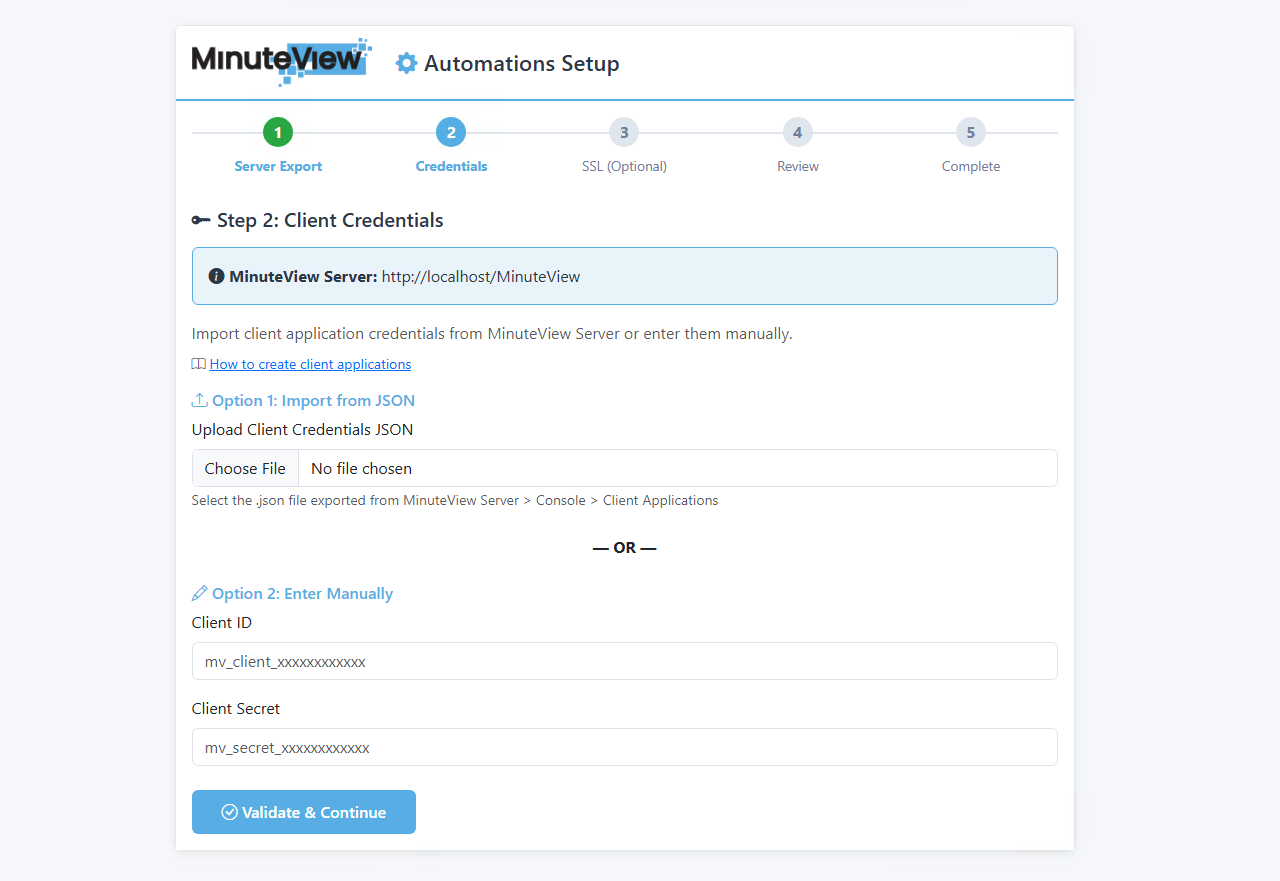
The Automations Engine requires secure authentication to the MinuteView Server.

6.2.1 Create Client Application in MinuteView Server ​

  1. Log into MinuteView Server
  2. Navigate to: Console → Client Applications
  3. Click Register New Client Application
  4. Complete registration
  5. Download the generated client application JSON file

6.2.2 Upload Client Application to Automations ​

  1. In the Automations setup page:
    • Upload the downloaded JSON file
  2. Click Validate

The system will:

  • Validate Client ID
  • Validate Client Secret
  • Confirm successful authentication

Optional Security Enhancement – Server Fingerprint Locking ​

You may enable fingerprint locking:

  • The automation server's machine fingerprint is registered
  • The client ID/secret becomes locked to that specific server
  • Prevents reuse on other machines

Enhanced Security

This enhances security by binding credentials to hardware.


Step 3 – Enable HTTPS (Optional) ​

SSL Certificate Setup

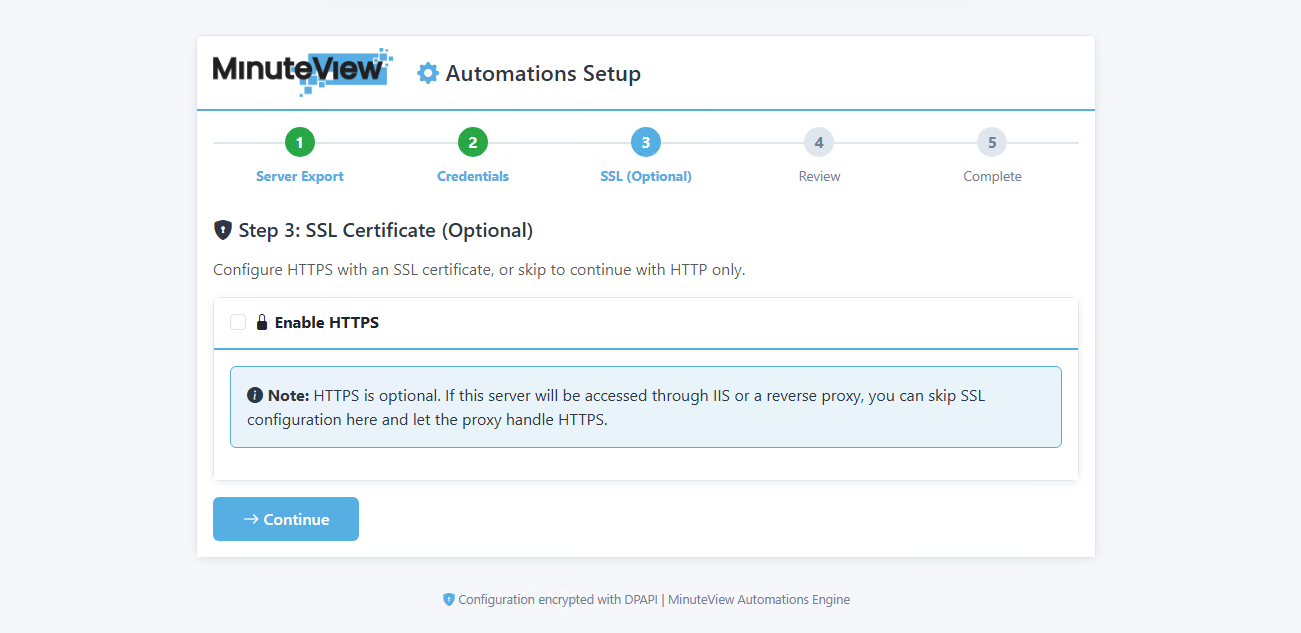
By default, Automations runs on HTTP.

If you require HTTPS:

  1. Enable HTTPS option
  2. Upload your PFX certificate file
  3. Enter certificate password
  4. Confirm certificate details

If HTTPS is not required:

  • You may continue using HTTP

Step 4 – Review Settings ​

Settings Review

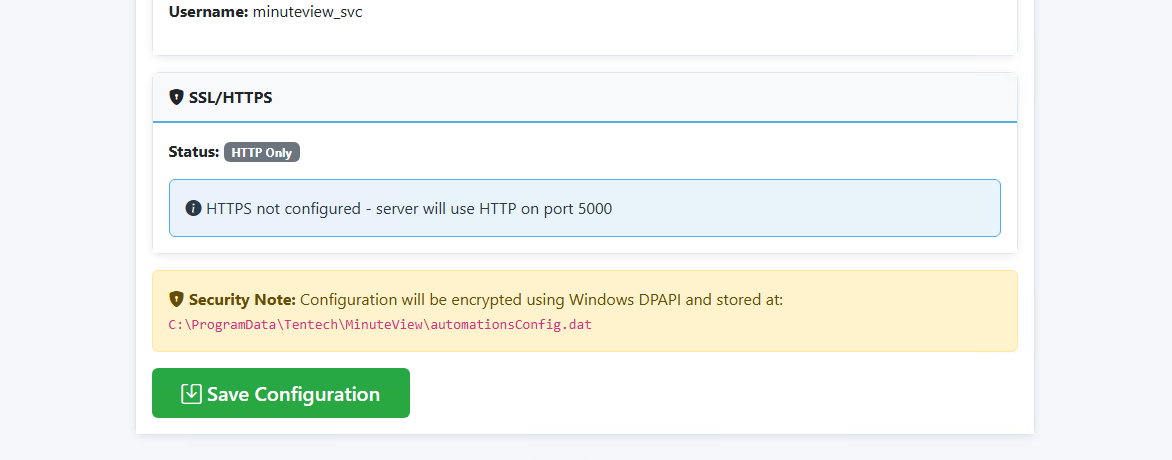
Before completing setup, review and confirm:

  • [ ] MinuteView Server URL is correct
  • [ ] Database connection is valid
  • [ ] Client application validated successfully
  • [ ] Elasticsearch (if used) is reachable
  • [ ] SSL (if configured) is valid

Click: Save Configuration
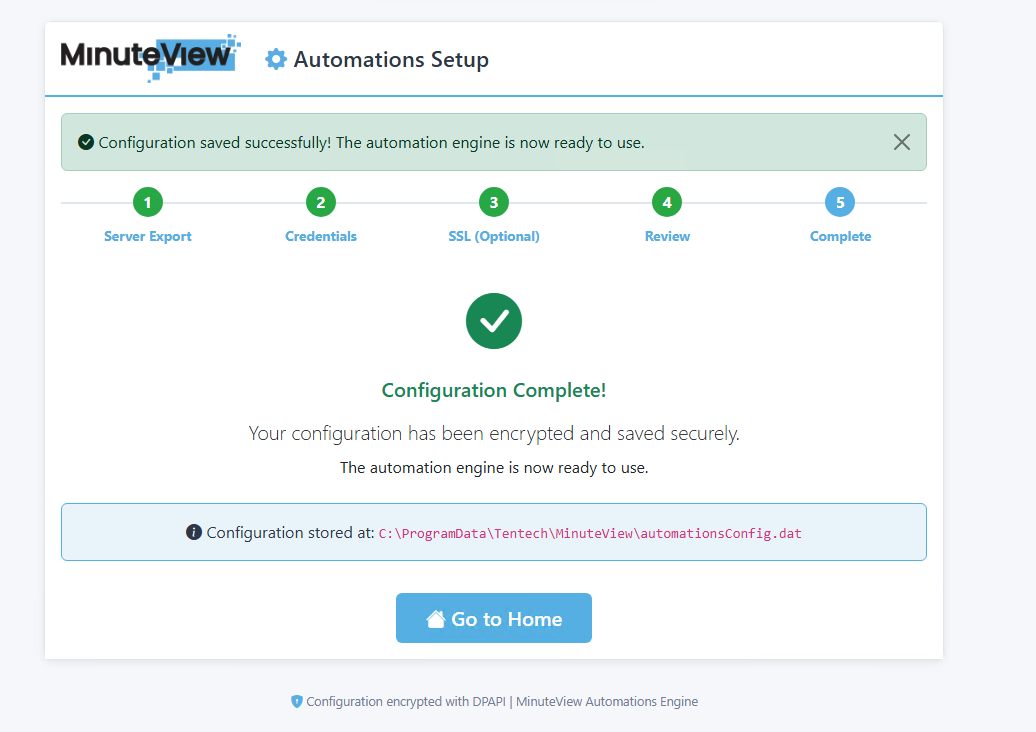

Step 5 – Configuration Complete ​

Configuration Complete

Upon success:

  • Configuration Complete message will display
  • Automations Engine is now operational
  • The engine will begin processing job queues

7. Register Automations URL in MinuteView Server ​

After setup:

  1. Note the Automations Engine URL (e.g., http://automation-server:5000)
  2. Navigate to MinuteView Server
  3. Go to: Console → Global Settings → Automations
  4. Enter the new Automations URL
  5. Save changes

Server Communication

MinuteView Server can now communicate with the Automations Engine and dispatch automation jobs.


8. Running as a Windows Service ​

After initial configuration, it's recommended to run Automations as a Windows Service.

8.1 Create Windows Service ​

Open PowerShell as Administrator and run:

powershell
sc create "MinuteView Automations" `
  binPath= "C:\Program Files (x86)\Tentech\MinuteView Automations\MinuteViewAutomations.exe" `
  start= auto `
  DisplayName= "MinuteView Automations Engine"

8.2 Configure Service Account ​

  1. Open Services (services.msc)
  2. Locate MinuteView Automations
  3. Right-click → Properties
  4. Navigate to Log On tab
  5. Configure service account with appropriate permissions:
    • Access to Vault (if using Vault integrations)
    • Network access to SQL Server
    • File system permissions for cache folders
    • Access to CAD applications (if needed)

8.3 Configure Recovery Options ​

On the Recovery tab:

  • First failure: Restart the Service
  • Second failure: Restart the Service
  • Subsequent failures: Restart the Service
  • Restart service after: 1 minute

8.4 Start the Service ​

powershell
net start "MinuteView Automations"

Or via Services console: Right-click → Start


9. Scaling with Multiple Automation Servers ​

To scale your automation capacity:

9.1 Install on Additional Servers ​

  1. Install Automations on additional servers
  2. Repeat setup steps 1-5
  3. Connect to the same database
  4. Register unique client applications (recommended)

9.2 How Multiple Servers Work ​

These servers will:

  • Join the Hangfire queue
  • Share workload
  • Execute queued tasks
  • Operate as distributed workers

9.3 Load Distribution ​

Hangfire automatically:

  • Distributes tasks across available servers
  • Ensures interop tasks run on appropriate servers
  • Prevents conflicts for single-access applications
  • Balances workload based on server availability

Scaling Strategy

For optimal performance:

  • Use dedicated automation servers for CAD-intensive tasks
  • Install multiple servers for high-volume workflows
  • Monitor Hangfire dashboard for queue health

10. Post-Installation Recommendations ​

10.1 Security Best Practices ​

  • [ ] Run Automations as a Windows Service after configuration
  • [ ] Use HTTPS in production environments
  • [ ] Implement SSL certificates for encrypted communication
  • [ ] Use dedicated service accounts with minimum required permissions
  • [ ] Enable firewall rules to restrict access
  • [ ] Regularly update client application credentials

10.2 Performance Optimization ​

  • [ ] Monitor Hangfire dashboard for queue performance
  • [ ] Allocate sufficient server resources (CPU, RAM)
  • [ ] Use dedicated servers for heavy interop workloads
  • [ ] Configure appropriate worker counts
  • [ ] Implement logging and monitoring

10.3 Backup and Recovery ​

  • [ ] Back up configuration files
  • [ ] Document client application credentials securely
  • [ ] Keep copies of SSL certificates and passwords
  • [ ] Document server fingerprints (if using locking)
  • [ ] Maintain list of all automation servers in environment

11. Integration Dependencies ​

Depending on your automation workflows, additional software may be required on automation servers:

IntegrationRequired SoftwarePurpose
Autodesk VaultVault Client 2025File and metadata operations within Vault
DWG ProcessingAutoCAD TrueView 2026DWG rendering, publishing, and export
DGN ProcessingMicroStation Connect EditionAutomated DGN conversions and exports
Inventor FilesAutodesk Inventor 2020+Inventor parameter and model updates
PDF CreationAdobe Acrobat or PDFCreatorAdvanced PDF generation

Installation Order

Install integration software before configuring automations that use them. Ensure all applications run successfully under the service account.


12. Verification ​

12.1 Verify Service Status ​

  1. Open Services (services.msc)
  2. Locate MinuteView Automations
  3. Verify status is Running
  4. Check Startup Type is Automatic

12.2 Test Automation Execution ​

  1. Log into MinuteView Server
  2. Navigate to Automations → Job Queue
  3. Create a simple test automation
  4. Verify execution completes successfully
  5. Check Hangfire dashboard for job history

12.3 Review Logs ​

Check application logs at:

C:\Program Files (x86)\Tentech\MinuteView Automations\Logs\

Look for:

  • Successful startup messages
  • MinuteView Server connection confirmation
  • Hangfire queue initialization
  • No critical errors

13. Troubleshooting ​

Service Won't Start ​

Symptoms: Service fails to start or immediately stops

Solutions:

  • Verify service account has "Log on as a service" right
  • Check service account password is correct
  • Review Windows Event Viewer for error details
  • Ensure configuration file exists and is valid JSON
  • Verify database connectivity

Can't Connect to MinuteView Server ​

Symptoms: Automations can't reach MinuteView Server

Solutions:

  • Verify Server URL in configuration is correct
  • Test connectivity: curl http://your-server/MinuteView
  • Check firewall rules allow communication
  • Verify MinuteView Server is running
  • Confirm client application credentials are valid

Client Application Validation Fails ​

Symptoms: Authentication errors during setup

Solutions:

  • Verify client application was created in MinuteView Server
  • Check Client ID and Client Secret match exactly
  • Ensure client application is enabled
  • Verify server fingerprint (if using locking)
  • Re-download client application JSON file

Hangfire Database Connection Fails ​

Symptoms: Cannot connect to SQL Server during setup

Solutions:

  • Verify SQL Server is running
  • Check SQL Authentication is enabled
  • Test connection using SQL Management Studio
  • Ensure firewall allows SQL traffic
  • Verify service account has database permissions

Jobs Not Processing ​

Symptoms: Automations created but not executing

Solutions:

  • Check Hangfire dashboard for queue status
  • Verify automation server is registered in MinuteView Server
  • Review service logs for errors
  • Ensure required integration software is installed
  • Check service account has necessary permissions

14. Hangfire Dashboard Access ​

The Hangfire dashboard provides real-time monitoring:

Access URL:

http://automation-server:5000/hangfire

Dashboard Features:

  • Real-time job queue monitoring
  • Job execution history
  • Server status and uptime
  • Failed job analysis
  • Recurring job management

Monitoring

Regularly review the Hangfire dashboard to identify bottlenecks and optimize automation performance.


15. Next Steps ​

After successful installation:


16. Support ​

For installation assistance:


Regular Maintenance

  • Keep MinuteView Automations updated with latest patches
  • Monitor log files for warnings or errors
  • Review Hangfire dashboard regularly
  • Maintain backups of configuration files
  • Test disaster recovery procedures

Appendix A: Configuration File Location ​

After setup, the configuration is stored at:

C:\Program Files (x86)\Tentech\MinuteView Automations\appsettings.json

Manual Editing

Only edit this file if instructed by Tentech support. Invalid JSON will prevent service startup.


Appendix B: Common Configuration Values ​

Default Ports ​

  • HTTP: 5000
  • HTTPS: 5001

Log Levels ​

Available log levels in appsettings.json:

  • Trace - Most verbose
  • Debug - Debugging information
  • Information - General information (recommended)
  • Warning - Warnings only
  • Error - Errors only
  • Critical - Critical errors only

Worker Configuration ​

Adjust worker count for performance tuning:

json
{
  "Hangfire": {
    "WorkerCount": 10
  }
}

Worker Count

  • Default: 10 workers
  • Increase for high-volume environments
  • Decrease for resource-constrained servers
  • Monitor CPU usage when adjusting

Tentech